In this project, we’re going to fine-tune a base Small Language Model (SLM) to extract food and drink items from text.
Why?
This is often referred to as structured data extraction.
We’re going to fine-tune the Gemma 3 270M model for structured data extraction from plain text.
Structured data extraction is a very common problem throughout many businesses.
For example, say you were getting a large volume of emails in plain text and needed to extract customer details from them.
Or you wanted to analyze a large number of news reports for specific details.
Or in our case, say you were building an app like Nutrify and you wanted to filter a large dataset of image captions for food/drink items (see the dataset mrdbourke/Recap-DataComp-1B-FoodOrDrink for a real-life example of this).
Essentially, structured data extraction can be used anywhere you have unstructured data such as raw notes or plain text and would like to turn it into structured information (e.g. JSON) you can analyze with Google Sheets or pandas or other data analysis tool.
Note
What is a small language model?
While there is no set definition on small, I define small as generally being 10B parameters and below.
With a preference for 1B parameters and below.
Ideally, a small language model can run comfortably on constrained hardware devices such as mobile phones.
And it can easily run on many samples simultaneously on consumer hardware.
While we are focused on data extraction from raw texts to structured food and drink items, I’d like you to consider structured data extraction as a universal problem space.
Wherever there is text or visual items, you have the potential to fine-tune a language model or vision-language model (VLM, can take vision and text as input) to extract information from them.
Structured data is a universal problem which language models and vision language models are very capable at. Especially if you fine-tune them for a specific task.
Keep this in mind so you can take the learnings from this project and apply them to your own problems.
The following table gives a few examples of problem spaces where structured data extraction can be valuable.
Input data type
Input Components
Extraction example
Products
Vision (Image of packaging)
Ingredients, nutritional facts, and allergens.
Articles
Text (Digital copy/OCR)
Author, publication date, and core topics.
Webpages
Text (HTML/Markdown)
Metadata, body text, and navigation links.
Recipes
Text + Vision (Iconography)
Ingredient lists, measurements, and instructions.
Plans
Vision (Diagram/Blueprint)
Dimensions, room labels, and architectural symbols.
Textbooks
Text + Vision (Diagrams)
Chapter summaries, key terms, and figure captions.
Notes
Vision (Handwriting/Photos)
Action items, dates, and brainstormed points.
Emails
Text (Digital format)
Sender details, meeting requests, and sentiment.
PDFs
Text + Vision (Layout)
Tabular data, document headers, and legal clauses.
Receipts
Vision (Photo of slip)
Merchant name, date, line items, and total.
News articles
Text (Digital/Newsfeed)
Headlines, locations, and stakeholder quotes.
Invoices
Text + Vision (Tables)
Invoice numbers, billing addresses, and payment terms.
1.2 How to fine-tune an LLM model
There are several ways to fine-tune an LLM including Supervised Fine-tuning (SFT) and Reinforcement Learning (RL).
We are going to do SFT because it’s the most straightforward.
In SFT, we construct samples of ideal inputs and outputs and the model learns to map a given input to a given output.
For example if our goal was to extract names:
Input: Hello my name is Daniel
Output: Daniel
The beauty and flexibility of lanugage models means that inputs and outputs can be any kind of string.
In our case:
Any input: Our inputs can be any kind of input string.
Constrained/structured outputs: Our outputs will be fine-tuned to conform to a structured data pattern.
TipLLM Fine-tuning Mindset
In LLM world, data inputs are tokens and data outputs are tokens.
A token is a numerical representation of some kind of data.
Computers like numbers (not images, text, videos, etc).
Everything must be turned into numbers.
And data = a very broad term.
It could be text, images, video (series of images), audio, DNA sequences, Excel spreadsheets, you name it.
The goal of the LLM is to be given an input sequence of tokens and then predict the following tokens.
So with this mindset, you can think of any problem as tokens in, tokens out.
Ask yourself: What tokens do I want to put in and what tokens do I want my model to return?
In our case, we want to put in almost any string input. And we want to get back structured information specifically related to food and drinks.
This a very specific use case, however, the beauty of LLMs being so general is that you can apply this tokens in, tokens out mindset to almost anything.
If you’ve got an existing dataset (no problem if you don’t, you can create one, let me know if you’d like a guide on this), chances are, you can fine-tune an LLM to do pretty well on it.
1.3 Why fine-tune your own small language model?
If there are many models that can do many tasks straight out of box via an API call, what’s the point of training your own small language model (SLM)?
Well… there are several:
Privacy - Fine-tuning your own model means you can run it on your own hardware and not have to send any data to a company that isn’t yours.
Great performance with a smaller footprint - You’d often be surprised how far you can get with a fine-tuned smaller model for a specific task (spoiler: in this notebook we’ll train a model ~450x smaller than its teacher to perform on par with it). Perhaps your custom task doesn’t need the biggest model available?
Can run offline - If you have a smaller custom model, you can deploy to edge hardware such as mobile devices and run it even without an internet connection.
Run it in batch mode - A smaller model can often run with many samples at once (batch mode) and with inference engines such as vLLM, you can often use it on 100s to 1000s of samples per second. This allows for large-scale inference jobs.
Cost savings - Once you’ve fine-tuned a small model to perform a particular task, you can run it over and over again without incurring API costs. The exact cost savings will depend on what tasks you’re doing and how often you run the model.
Download our target training dataset, FoodExtract-1k using Hugging Face datasets.
Inspect our dataset using Hugging Face datasets.
Train model on dataset using Hugging Face trl (TRL = Transformers Reinforcement Learning).
Evaluate the model by looking at several examples of inputs and predicted outputs as well as target outputs.
Create an interactive demo using Hugging Face’s gradio.
Bonus: Make the demo public so other people can use it with Hugging Face Spaces.
1.6 Prompting vs RAG vs Fine-tuning
Prompting, RAG (Retrieval Augmented Generation) and Fine-tuning are three different techniques to get a language model to perform how you’d like.
While there’s much debate about which one to use, I’m going to tell you to use all three.
Start with prompting since it’s the simplest.
Use RAG if you need your model to output specific referenced knowledge.
And fine-tune a model directly if you want it to perform specific tasks like structured data extraction in a certain way over and over again.
You can even mix and match the techniques.
There is much debate on using prompting, RAG or fine-tuning and the pros and cons of each. But like many software systems, the answer is not one and only, there is room for multiple options. They can all be used for separate tasks and can even be combined in the same system. After all, they are all techniques trying to achieve the goal of getting the right outputs from a target model.
For our FoodExtract system, we could create synthetic data by prompting a larger model to extract food/drinks from raw texts (I did this with gpt-oss-120b) to create an initial dataset. We could use RAG if we wanted our model to be able to reference nutrition data from a database (e.g. retrieve the matching foods in the nutrition database based on the foods extracted with the FoodExtract model). Finally, we could use fine-tuning to guide our model to output our desired data structure given a raw text input (this is the premise of the whole notebook).
In essence, prompting, RAG and fine-tuning all have a shared goal: getting the ideal outputs out of your model.
Technique
Details
Example
When to use
Prompting
Directly ask the model what you’d like it do, optionally provide examples of inputs and outputs.
“Please extract the food and drink items from this text into a structured JSON. Examples: …”
You would generally start here since it’s the most straightforward to implement. You could even start here to produce synthetic data for your target task.
RAG (Retrieval Augmented Generation)
Pass the model relevant context details based on a search query and instruct it to generate a response based on those documents.
“Find me foods high in protein” -> search docs for foods high protein -> pass to model -> model creates response.
If you need to inject specific knowledge into your model. For example, you have custom business processes and information you’d like the model to reference when it creates a response.
Fine-tuning
Update the model’s weights to perform a specific task based on input and ideal output data.
Pass a model ~1000 samples of how it should extract structured data from raw text (what we’re doing in this notebook).
When you’d like the model to perform a very specific task or respond in a certain way over and over again. For example, you’re an insurance company who wants to extract structured data directly from emails to JSON 10,000x times per day.
1.7 Definitions
Some quick definitions of what we’re doing.
Base model - A model used to build upon for a specific task via fine-tuning. A base model usually already has a good representation of the problem space you’re working in. For example, Gemma 3 270M is already quite a powerful language model, it has a good base representation of language. Our goal will be to tweak this existing representation for our target task. This process is also referred to as transfer learning, taking the knowledge of an existing model and customizing it for your own specific task.
Synthetic data - Data generated by another model or via a step-by-step process to be used as training data for another model. For example, in our FoodExtract task, we generated synthetic data by prompting gpt-oss-120b (a much larger and powerful language model) to perform our target task of structured food and drink data extraction on existing image captions. We’ll use this dataset later on to fine-tune a much smaller model to repeat the task. Synthetic data can also be generated by a programmtic process rather than generative model. For example, if your goal was to extract information from PDFs, you could programmatically construct many different PDFs with different structures and information in a procedural way. Then your training data could be the exact data used to generate the PDF (perfect ground truth labels) such as what text is where, what the figures contain and more. You could then train a PDF extraction model to extract data from PDFs in the exact styling that was used to generate them.
Full fine-tuning - All weights on the model are updated. Often takes longer and requires larger hardware capacity, however, if your model is small enough (e.g. 270M parameter or less), you can often do full fine-tuning.
SLM (Small Language Model) - A subjective definition but to me a Small Language Model is a model with under 1-10B parameters, with added bonus for being under 500M parameters. Less parameters generally means less performance. However, when you have a specific task, SLMs often shine because they can be tailored for that specific task. If your task is “I want to create a chatbot capable of anything”, you’ll generally want the biggest model you can reasonably serve. If your task is “I want to extract some structured data from raw text inputs”, you’ll probably be surprised how well a SLM can perform.
2 Getting Setup
If you are following along with the code locally on your own comptuer or with Google Colab, be sure to follow the setup steps on the Setup page. For the best experience, it’s best if you run this notebook with a GPU backend.
After completing those steps, we can proceed with the rest of the sections.
If you’re happy just to keep reading, feel free to jump ahead.
3 Import dependencies
Note: If you’re in Google Colab, you may have to install trl, accelerate and gradio.
For Google Colab:
!pip install trl accelerate gradio
In [3]:
# Set TOKENIZERS_PARALLELISM = "false" to avoid warningsimport osos.environ["TOKENIZERS_PARALLELISM"] ="false"# Base importsimport transformers import trl # trl = Transformers Reinforcement Learning -> https://github.com/huggingface/trl import datasets import accelerateimport gradio as gr
Now let’s make sure we’ve got enough GPU memory.
In [4]:
# Check the amount of GPU memory available (we need at least ~16GB)# CUDA = NVIDIA GPU backend# MPS = macOS Metal Performance Shaders backend (Apple Silicon)# Note: Training on macOS/MPS is significantly slower than on CUDA/NVIDIA GPUs.# MPS is fine for learning, experimentation and inference, but expect longer training times.import torchDEVICE ="cuda"if torch.cuda.is_available() else"mps"if torch.backends.mps.is_available() else"cpu"print(f"Using device: {DEVICE}")if DEVICE =="cuda": device = torch.cuda.current_device() gpu_name = torch.cuda.get_device_name(device) total_memory = torch.cuda.get_device_properties(device).total_memory allocated_memory = torch.cuda.memory_allocated(device) reserved_memory = torch.cuda.memory_reserved(device) free_memory = total_memory - reserved_memoryprint(f"Backend: CUDA")print(f"GPU: {gpu_name}")print(f"Total Memory: {total_memory /1e6:.2f} MB | {total_memory /1e9:.2f} GB")print(f"Allocated Memory: {allocated_memory /1e6:.2f} MB | {allocated_memory /1e9:.2f} GB")print(f"Reserved Memory: {reserved_memory /1e6:.2f} MB | {reserved_memory /1e9:.2f} GB")print(f"Free Memory: {free_memory /1e6:.2f} MB | {free_memory /1e9:.2f} GB")elif DEVICE =="mps":# Note: MPS doesn't expose detailed memory stats like CUDA.# Apple Silicon uses unified memory (shared between CPU and GPU).# You can check total system memory as a proxy.import subprocess total_memory =int(subprocess.check_output(["sysctl", "-n", "hw.memsize"]).strip())print(f"Backend: MPS")print(f"Device: Apple Silicon (Metal Performance Shaders)")print(f"Total System Memory (unified): {total_memory /1e6:.2f} MB | {total_memory /1e9:.2f} GB")# Verify MPS works with a quick tensor test x = torch.tensor([1.0, 2.0]).to("mps")print(f"MPS tensor test: {x.device}")else:print("No GPU available (no CUDA or MPS backend found)")
Out [4]:
Using device: cuda
Backend: CUDA
GPU: NVIDIA GB10
Total Memory:     128524.03 MB | 128.52 GB
Allocated Memory: 0.00 MB | 0.00 GB
Reserved Memory:  0.00 MB | 0.00 GB
Free Memory:      128524.03 MB | 128.52 GB
/home/mrdbourke/miniforge3/envs/ai/lib/python3.12/site-packages/torch/cuda/__init__.py:435: UserWarning:
    Found GPU0 NVIDIA GB10 which is of cuda capability 12.1.
    Minimum and Maximum cuda capability supported by this version of PyTorch is
    (8.0) - (12.0)

  queued_call()
4 Setup Base Model
The base model we’ll be using is gemma-3-270m-it (the -it stands for “Instruction-Tuned”). I’ve tried with the base model (gemma-3-270m) as well and found fine-tuning each gives largely similar results.
It’s the same architecture style as larger LLMs such as Gemini but at a much smaller scale.
This is why we refer to it as a “Small Language Model” or SLM.
We can load our model and its assosciated tokenizer using transformers.
Note
A tokenizer converts raw string values into tokens which are numerical values our model can understand.
For example:
tokenizer("Hello my name is Daniel") -> [2, 9259, 1041, 1463, 563, 13108]
In [5]:
from transformers import AutoTokenizer, AutoModelForCausalLMMODEL_NAME ="google/gemma-3-270m-it"# note: "it" stands for "instruction tuned" which means the model has been tuned for following instructionsmodel = AutoModelForCausalLM.from_pretrained( MODEL_NAME, dtype="auto", device_map="auto", # put the model on the GPU attn_implementation="eager"# could use flash_attention_2 but ran into issues... so stick with Eager for now)tokenizer = AutoTokenizer.from_pretrained(MODEL_NAME)print(f"[INFO] Model on device: {model.device}")print(f"[INFO] Model using dtype: {model.dtype}")
Out [5]:
[INFO] Model on device: cuda:0
[INFO] Model using dtype: torch.bfloat16
import torch input_string ="Hello my name is Daniel"print(f"[INFO] Input string: {input_string}")token_tensor = torch.tensor(tokenizer(input_string)["input_ids"]).unsqueeze(0).to(DEVICE)print(f"[INFO] Token tensor shape: {token_tensor.shape}")print(f"[INFO] Token tensor dtype: {token_tensor.dtype}")print(f"[INFO] Token tensor device: {token_tensor.device}")print(f"[INFO] Token tensor: {token_tensor}")outputs = model(token_tensor)outputs.keys()
Out [11]:
[INFO] Input string: Hello my name is Daniel
[INFO] Token tensor shape: torch.Size([1, 6])
[INFO] Token tensor dtype: torch.int64
[INFO] Token tensor device: cuda:0
[INFO] Token tensor: tensor([[    2,  9259,  1041,  1463,   563, 13108]], device='cuda:0')
odict_keys(['logits', 'past_key_values'])
Feel free to inspec the 'logits' and 'past_key_values' our model outputs, however, these aren’t necessarily valuable to use yet.
We’ll need to convert them back into tokens so we can read them.
In [8]:
# Get the logits shapelogits = outputs.logitsprint(f"[INFO] Logits shape: {logits.shape}")
Out [8]:
[INFO] Logits shape: torch.Size([1, 6, 262144])
This comes in the form [batch_size, num_tokens, vocab_size] where vocab_size is the number of unique tokens in our model’s tokenizer. Each one maps to a specific sequence.
4.1 Tokens in, tokens out
We input tokens into our model and it output some values called "logits".
These are raw outputs from the model.
To make them understandable, we’ll have to convert them to tokens and then from tokens back to text.
To go from logits to most likely token we can take the maximum logit value across the vocab_size (also called the vocab dimension).
Then we can use our tokenizer’s built-in methods of convert_ids_to_tokens and decode to get text-based outputs.
In [13]:
# Get the predicted token IDs by taking argmax over the vocab dimensionpredicted_ids = outputs.logits.argmax(dim=-1) # shape: [1, seq_len]print(f"[INFO] Predicted token IDs shape: {predicted_ids.shape}")print(f"[INFO] Predicted token IDs: {predicted_ids}")# Decode back to textpredicted_tokens = tokenizer.convert_ids_to_tokens(predicted_ids[0])predicted_text = tokenizer.decode(predicted_ids[0])print(f"[INFO] Token IDs: {predicted_ids[0].tolist()}")print(f"[INFO] Tokens: {predicted_tokens}")print(f"[INFO] Decoded text: {predicted_text}")print(f"\n[INFO] Original input string: {input_string}")
Out [13]:
[INFO] Predicted token IDs shape: torch.Size([1, 6])
[INFO] Predicted token IDs: tensor([[  1106, 236888,   4389,    563,    870, 236764]], device='cuda:0')
[INFO] Token IDs: [1106, 236888, 4389, 563, 870, 236764]
[INFO] Tokens: ['import', '!', '▁friend', '▁is', '▁[', ',']
[INFO] Decoded text: import! friend is [,

[INFO] Original input string: Hello my name is Daniel
Hmm… it doesn’t seem our model’s outputs are very good for what we input. Perhaps there’s a missing preprocessing step? We’ll investigate this later on.
4.2 Counting the number of parameters in our model
Let’s confirm our model is a smaller model by counting the number of parameters in it.
In [6]:
def get_model_num_params(model):""" Returns the number of trainable, non-trainable and total parameters of a PyTorch model. """ trainable_params =sum(p.numel() for p in model.parameters() if p.requires_grad) non_trainable_params =sum(p.numel() for p in model.parameters() ifnot p.requires_grad) total_params = trainable_params + non_trainable_paramsreturn {"trainable_params": trainable_params,"non_trainable_params": non_trainable_params,"total_params": total_params}# Get parameters of our fine-tuned modelmodel_params = get_model_num_params(model)print(f"Trainable parameters: {model_params['trainable_params']:,}")print(f"Non-trainable parameters: {model_params['non_trainable_params']:,}")print(f"Total parameters: {model_params['total_params']:,}")
Out [6]:
Trainable parameters: 268,098,176
Non-trainable parameters: 0
Total parameters: 268,098,176
Alright, looks like our model has 268,098,176 parameters and all of them are trainable (they will be updated during training).
How does this compare to the number of parameters in our teacher model?
Note
We’ll see shortly that we used a larger model, openai/gpt-oss-120b to label our dataset with ground truth labels, we’ll want to train our smaller model, google/gemma-3-270m-it to reproduce these labels.
This is a common workflow known as distillation or using a larger, more powerful model to teach a smaller, more efficient model to do the same task.
In [7]:
gpt_oss_120b_parameter_count =120_000_000_000gemma_3_270m_parameter_count = model_params['total_params']parameter_ratio = gpt_oss_120b_parameter_count / gemma_3_270m_parameter_countprint(f"[INFO] Gemma 3 270M is {parameter_ratio:.2f}x smaller than gpt-oss-120b.")
Out [7]:
[INFO] Gemma 3 270M is 447.60x smaller than gpt-oss-120b.
By fine-tuning Gemma 3 270M we distill the capabilities of a 120B parameter teacher model (gpt-oss-120b) into a model ~448x smaller.
It was created from image captions + random strings and then using gpt-oss-120b (a powerful open-source LLM) to do synthetic labelling into our target format.
For more on the dataset you can read the README.md file explaining it.
The main thing we are concerned about is that we want the input to our model to be the "sequence" column and the output to be the "gpt-oss-120b-label-condensed" column.
We’ll explore these below.
In [8]:
from datasets import load_datasetdataset = load_dataset("mrdbourke/FoodExtract-1k")print(f"[INFO] Number of samples in the dataset: {len(dataset['train'])}")
Out [8]:
[INFO] Number of samples in the dataset: 1420
Right now our dataset only has a training split (the default when no pre-defined splits are set).
We can break it into a training and test set later on.
For now, let’s look at some random samples.
In [9]:
import astimport randomdef get_random_idx(dataset):"""Returns a random integer index based on the number of samples in the dataset.""" random_idx = random.randint(0, len(dataset)-1)return random_idxrandom_idx = get_random_idx(dataset["train"])random_sample = dataset["train"][random_idx]example_input = random_sample["sequence"]example_output = random_sample["gpt-oss-120b-label"]example_output_condensed = random_sample["gpt-oss-120b-label-condensed"]print(f"[INFO] Input:\n{example_input}\n")print()print(f"[INFO] Example structured JSON output (what we want to turn our raw texts into):\n")print(ast.literal_eval(example_output)) # ast.literal_eval turns the string into JSONprint()print(f"[INFO] Example output condensed (we'll train our model to predict the condensed output since it uses less tokens than JSON):\n")print(example_output_condensed)
Out [9]:
[INFO] Input:
The image is a detailed, graphic rendering of an open box of assorted chocolates set against a light blue background. The light brown box, adorned with a matching beige ribbon border, has its lid floating just above it, giving a clear view of the delectable contents inside. Starting from the top left, the first section of the box holds two dark chocolate squares, followed by a delightful swirl of dark and white chocolate confections. Next, another solitary dark chocolate square is positioned adjacent to a diamond-shaped chocolate with elegant ridges. A predominantly white circular chocolate with intricate dark brown lines adds a touch of sophistication. Moving to the bottom row, a dark chocolate square topped with coconut shavings is placed next to a charming pink heart-shaped candy. Beside it lies a diamond-cut chocolate piece adorned with intricate wedges. Finally, in the far right corner of the box, an assortment of small chocolate squares in alternating white and dark brown offers a visually appealing conclusion to this mouthwatering array.


[INFO] Example structured JSON output (what we want to turn our raw texts into):

{'is_food_or_drink': True, 'tags': ['fi', 'fp', 'fa'], 'food_items': ['dark chocolate squares', 'dark and white chocolate confections', 'dark chocolate square', 'diamond-shaped chocolate', 'white circular chocolate', 'dark chocolate square topped with coconut shavings', 'coconut shavings', 'pink heart-shaped candy', 'diamond-cut chocolate piece', 'small chocolate squares'], 'drink_items': []}

[INFO] Example output condensed (we'll train our model to predict the condensed output since it uses less tokens than JSON):

food_or_drink: 1
tags: fi, fp, fa
foods: dark chocolate squares, dark and white chocolate confections, dark chocolate square, diamond-shaped chocolate, white circular chocolate, dark chocolate square topped with coconut shavings, coconut shavings, pink heart-shaped candy, diamond-cut chocolate piece, small chocolate squares
drinks:
5.1 Assigning tags to our samples
Because we’d like to use our model to potentially filter a large corpus of data, we get it to assign various tags to the text as well.
These tags could be anything we’d like to define. Because of the nature of our language model, it will be able to learn which tag it should assign to a given piece of text based on its training data.
We can use these tags later to find particular types of texts, for example, if we wanted specifically nutrition_panel related texts, we’d filter for the np tag.
Note
We’ve shortened our tags here for interest of shorter generations, for example, ingredient_list gets shortened to il.
We don’t necessarily have to do this.
For smaller sample sizes or more complicated labellings, we may actually want our model to generate the full tags so it has more context.
We’ll leave this for experimentation.
Just remember, because of flexibility of language models, you can define the outputs how you’d like.
The tags we’d like to assign are as follows.
In [10]:
# Our fine-tuned model will assign tags to text so we can easily filter them by type in the futuretags_dict = {'np': 'nutrition_panel','il': 'ingredient_list','me': 'menu','re': 'recipe','fi': 'food_items','di': 'drink_items','fa': 'food_advertistment','fp': 'food_packaging'}
5.2 Format the dataset into LLM-style inputs/outputs
Right now we have examples of string-based inputs and structured outputs.
However, our LLMs generally want things in the format of:
{"user": "Hello my name is Daniel",
 "assistant": "Hi Daniel, I'm an LLM"}
Where the "user" is the person giving the inputs (e.g. us typing into the model).
And the "assistant" is the model itself.
In other words, many pretrained models on Hugging Face are setup in a way that they want structure around the intputs and outputs rather than just raw information. Keep this noted as if you use a model which requires format X but you try to use format Y, you’ll likely get poor results.
Let’s remind ourselves what our raw samples look like.
In [11]:
random_sample
Out [11]:
{'sequence': 'The image is a detailed, graphic rendering of an open box of assorted chocolates set against a light blue background. The light brown box, adorned with a matching beige ribbon border, has its lid floating just above it, giving a clear view of the delectable contents inside. Starting from the top left, the first section of the box holds two dark chocolate squares, followed by a delightful swirl of dark and white chocolate confections. Next, another solitary dark chocolate square is positioned adjacent to a diamond-shaped chocolate with elegant ridges. A predominantly white circular chocolate with intricate dark brown lines adds a touch of sophistication. Moving to the bottom row, a dark chocolate square topped with coconut shavings is placed next to a charming pink heart-shaped candy. Beside it lies a diamond-cut chocolate piece adorned with intricate wedges. Finally, in the far right corner of the box, an assortment of small chocolate squares in alternating white and dark brown offers a visually appealing conclusion to this mouthwatering array.',
 'image_url': 'https://objaverse-thumbnail-images.s3.us-west-2.amazonaws.com/72a3f9948d444a6db198702801648057.jpg',
 'class_label': 'food',
 'source': 'pixmo_cap_dataset',
 'char_len': 1060.0,
 'word_count': 168.0,
 'syn_or_real': 'real',
 'uuid': 'f9262c2f-d603-42a1-8fb7-56b157e8d9f6',
 'gpt-oss-120b-label': "{'is_food_or_drink': True, 'tags': ['fi', 'fp', 'fa'], 'food_items': ['dark chocolate squares', 'dark and white chocolate confections', 'dark chocolate square', 'diamond-shaped chocolate', 'white circular chocolate', 'dark chocolate square topped with coconut shavings', 'coconut shavings', 'pink heart-shaped candy', 'diamond-cut chocolate piece', 'small chocolate squares'], 'drink_items': []}",
 'gpt-oss-120b-label-condensed': 'food_or_drink: 1\ntags: fi, fp, fa\nfoods: dark chocolate squares, dark and white chocolate confections, dark chocolate square, diamond-shaped chocolate, white circular chocolate, dark chocolate square topped with coconut shavings, coconut shavings, pink heart-shaped candy, diamond-cut chocolate piece, small chocolate squares\ndrinks:',
 'target_food_names_to_use': None,
 'caption_detail_level': None,
 'num_foods': None,
 'target_image_point_of_view': None}
Ok, now we can make a helper function to turn our samples into conversation style.
In [12]:
def sample_to_conversation(sample):"""Helper function to convert an input sample to prompt-completion style."""return {"prompt": [ {"role": "user", "content": sample["sequence"]} # Load the sequence from the dataset ],"completion": [ {"role": "assistant", "content": sample["gpt-oss-120b-label-condensed"]} # Load the gpt-oss-120b generated label ] }sample_to_conversation(random_sample)
Out [12]:
{'prompt': [{'role': 'user',
   'content': 'The image is a detailed, graphic rendering of an open box of assorted chocolates set against a light blue background. The light brown box, adorned with a matching beige ribbon border, has its lid floating just above it, giving a clear view of the delectable contents inside. Starting from the top left, the first section of the box holds two dark chocolate squares, followed by a delightful swirl of dark and white chocolate confections. Next, another solitary dark chocolate square is positioned adjacent to a diamond-shaped chocolate with elegant ridges. A predominantly white circular chocolate with intricate dark brown lines adds a touch of sophistication. Moving to the bottom row, a dark chocolate square topped with coconut shavings is placed next to a charming pink heart-shaped candy. Beside it lies a diamond-cut chocolate piece adorned with intricate wedges. Finally, in the far right corner of the box, an assortment of small chocolate squares in alternating white and dark brown offers a visually appealing conclusion to this mouthwatering array.'}],
 'completion': [{'role': 'assistant',
   'content': 'food_or_drink: 1\ntags: fi, fp, fa\nfoods: dark chocolate squares, dark and white chocolate confections, dark chocolate square, diamond-shaped chocolate, white circular chocolate, dark chocolate square topped with coconut shavings, coconut shavings, pink heart-shaped candy, diamond-cut chocolate piece, small chocolate squares\ndrinks:'}]}
Wonderful!
Now let’s map the sample_to_conversation helper function to our dataset with datasets.Dataset.map.
I’ve turned batched=False on here because when I set batched=True I was getting errors. You may want to try otherwise.
In [13]:
# Map our sample_to_conversation function to dataset dataset = dataset.map(sample_to_conversation, batched=False)dataset["train"][42]
Out [13]:
{'sequence': 'another optional quest takes place on windfall island during the night time play the song of passing a number of times and each time, glance towards the sky',
 'image_url': 'https://portforward.com/games/walkthroughs/The-Legend-of-Zelda-The-Wind-Waker/The-Legend-of-Zelda-The-Wind-Waker-large-430.jpg',
 'class_label': 'not_food',
 'source': 'qwen2vl_open_dataset',
 'char_len': 156.0,
 'word_count': 28.0,
 'syn_or_real': 'real',
 'uuid': 'bbac79ce-df1f-48b8-891c-752809be11c7',
 'gpt-oss-120b-label': "{'is_food_or_drink': 'false', 'tags': [], 'food_items': [], 'drink_items': []}",
 'gpt-oss-120b-label-condensed': 'food_or_drink: 0\ntags: \nfoods: \ndrinks:',
 'target_food_names_to_use': None,
 'caption_detail_level': None,
 'num_foods': None,
 'target_image_point_of_view': None,
 'prompt': [{'content': 'another optional quest takes place on windfall island during the night time play the song of passing a number of times and each time, glance towards the sky',
   'role': 'user'}],
 'completion': [{'content': 'food_or_drink: 0\ntags: \nfoods: \ndrinks:',
   'role': 'assistant'}]}
Notice how we now have we now have "prompt" and "completion" keys in our dataset samples.
The "prompt" key will be the input to our model and the "completion" key is what we’ll be training it to produce.
5.3 Creating a train/test split
Time to turn our data into a training/test split.
Our model will be trained on the training split.
And then evaluated on the test split.
We keep the test split separate from our model’s training so we can purposely evaluate our model on samples its never seen before.
To create a train/test split we can use the method datasets.Dataset.train_test_split with test_size=0.2 for an 80% train and 20% test subset.
In [14]:
# Create a train/test splitdataset = dataset["train"].train_test_split(test_size=0.2, shuffle=False, seed=42)# Number #1 rule in machine learning# Always train on the train set and test on the test set# This gives us an indication of how our model will perform in the real worlddataset
Hugging Face’s pipeline is a simple entry point to using many different models.
It handles model loading and adds access to the specific tokenizer/preprocessor for a model.
In [16]:
from transformers import pipeline # Load model and use it as a pipelineprint(f"[INFO] Creating pipeline with model: {MODEL_NAME}\n")pipe = pipeline("text-generation", model=model, tokenizer=tokenizer)input_text ="Hi my name is Daniel. Please reply to me with a machine learning poem."print(f"[INFO] This is the raw text input:\n{input_text}\n")# Prepare the sample and tokenizeeasy_sample = create_easy_sample(input=input_text)input_prompt = pipe.tokenizer.apply_chat_template([easy_sample], # pipeline tokenizer wants a list of inputs tokenize=False, add_generation_prompt=True)# Pass the prepared input prompt through the pipelinedefault_outputs = pipe(input_prompt, max_new_tokens=512, disable_compile=True)print(f"[INFO] This is the input prompt: {input_prompt}")print(f"[INFO] Output from {MODEL_NAME}:")print(default_outputs[0]["generated_text"][len(input_prompt):])
Out [16]:
Device set to use cuda:0
[INFO] Creating pipeline with model: google/gemma-3-270m-it

[INFO] This is the raw text input:
Hi my name is Daniel. Please reply to me with a machine learning poem.

[INFO] This is the input prompt: <bos><start_of_turn>user
Hi my name is Daniel. Please reply to me with a machine learning poem.<end_of_turn>
<start_of_turn>model

[INFO] Output from google/gemma-3-270m-it:
Hi Daniel,
I'm ready to be your machine learning poem.
Example machine learning poem generated by Gemma 3 270:
Okay, Daniel, here's a machine learning poem. I've tried to capture a feeling of wonder and a bit of mystery.

The algorithm learns,
A silent, tireless quest.
Through data streams, it flows,
A symphony of thought.
Each point a new layer,
A learning bloom,
A future bright and clear.

It analyzes the data,
No single clue it knows.
It weaves a pattern true,
A story in the hue.
The world unfolds anew,
With subtle, complex view.

It's not just numbers,
But feeling, a soul.
A tapestry of grace,
A hopeful, vibrant space.
A learning, growing deep,
Secrets it will keep.
Not too bad!
But just beware, you will likely get different outputs each time.
This is because of nondeterminism of LLMs (for more on this concept and ways around it, refer to the blog post Defeating Nondeterminism in LLM Inference by Thinking Machines).
5.5 What is a chat template?
Depending on the model you use, it may have been trained in a certain way to expect a certain kind of input.
The input formatter can be referred to as many things:
A chat template
A preprocessor
Prefix tokens
In our case, we can view our models chat template with tokenizer.chat_template.
In [17]:
print(tokenizer.chat_template)
Out [17]:
{{ bos_token }}
{%- if messages[0]['role'] == 'system' -%}
    {%- if messages[0]['content'] is string -%}
        {%- set first_user_prefix = messages[0]['content'] + '

' -%}
    {%- else -%}
        {%- set first_user_prefix = messages[0]['content'][0]['text'] + '

' -%}
    {%- endif -%}
    {%- set loop_messages = messages[1:] -%}
{%- else -%}
    {%- set first_user_prefix = "" -%}
    {%- set loop_messages = messages -%}
{%- endif -%}
{%- for message in loop_messages -%}
    {%- if (message['role'] == 'user') != (loop.index0 % 2 == 0) -%}
        {{ raise_exception("Conversation roles must alternate user/assistant/user/assistant/...") }}
    {%- endif -%}
    {%- if (message['role'] == 'assistant') -%}
        {%- set role = "model" -%}
    {%- else -%}
        {%- set role = message['role'] -%}
    {%- endif -%}
    {{ '<start_of_turn>' + role + '
' + (first_user_prefix if loop.first else "") }}
    {%- if message['content'] is string -%}
        {{ message['content'] | trim }}
    {%- elif message['content'] is iterable -%}
        {%- for item in message['content'] -%}
            {%- if item['type'] == 'image' -%}
                {{ '<start_of_image>' }}
            {%- elif item['type'] == 'text' -%}
                {{ item['text'] | trim }}
            {%- endif -%}
        {%- endfor -%}
    {%- else -%}
        {{ raise_exception("Invalid content type") }}
    {%- endif -%}
    {{ '<end_of_turn>
' }}
{%- endfor -%}
{%- if add_generation_prompt -%}
    {{'<start_of_turn>model
'}}
{%- endif -%}
Notice how the chat template filters through different types of messages and gets them ready for use with a model?
5.6 Attempt 0: Try the model on one of our sequences
Okay, we’ve gotten the model to write a machine learning poem.
How about we get to perform on one of our samples?
In [18]:
# Get a random samplerandom_idx = get_random_idx(dataset["train"])random_train_sample = dataset["train"][random_idx]raw_text_input = random_train_sample["sequence"]# Apply the chat templateinput_prompt = pipe.tokenizer.apply_chat_template(conversation=random_train_sample["prompt"], tokenize=False, add_generation_prompt=True)# Let's run the default model on our inputdefault_outputs = pipe(text_inputs=input_prompt, max_new_tokens=256)# View and compare the outputsprint(f"[INFO] Input (raw text):\n{raw_text_input}\n")print(f"[INFO] Input (prompt formatted):\n{input_prompt}\n")print(f"[INFO] Output:\n{default_outputs[0]['generated_text'][len(input_prompt):]}")
Out [18]:
[INFO] Input (raw text):
a few children use the child sized chairs for watching television television not shown in this photo

[INFO] Input (prompt formatted):
<bos><start_of_turn>user
a few children use the child sized chairs for watching television television not shown in this photo<end_of_turn>
<start_of_turn>model


[INFO] Output:
I understand. Is there anything else I can help you with? Perhaps you'd like to explore other options?
By default the model produces a fairly generic response.
This is expected and good.
It means the model has a good baseline understanding of language.
If it responded with pure garbage, we might have an uphill battle.
However, this response type is not what we want. We want our model to respond with structured data based on the input.
Good news is we can adjust the patterns in our model to do just that.
5.7 Attempt 1: Let’s try to prompt the model
We want a model to extract food and drink items from text.
By default the model will just reply to any text input with a generic response based on what it has seen in its training data.
However, we can try and get our ideal outputs via prompting.
So we’ll write the following:
A prompt to tnstruct our model to extract food and drink items.
A helper function to format our prompt with a target sample.
In [19]:
prompt_instruction ="""Given the following target input text from an image caption, please extract the food and drink items to a list. If there are no food or drink items, return an empty list.Return in the following format:food_items: [food_item_1, food_item_2, food_item_3]drink_items: [drink_item_4, drink_item_5]For example:Input text: Hello my name is Daniel.Output:food_items: []drink_items: []Example 2:Input text: A plate of rice cakes, salmon, cottage cheese and small cherry tomatoes with a cup of tea.Output:food_items: ['rice cakes', 'salmon', 'cottage cheese', 'cherry tomatoes']drink_items: ['cup of tea']Return only the formatted output and nothing else.Target input text: <targ_input_text>"""def update_input_message_content(input):"""Helper function to format our prompt with target input text from a given message sample.""" original_content =input["prompt"][0]["content"] new_content = prompt_instruction.replace("<targ_input_text>", original_content) new_input = [{"content": new_content,"role": "user"}]return new_inputprint(f'[INFO] Original content:\n{random_train_sample["prompt"][0]["content"]}')print()print(f'[INFO] New content with instructions in prompt:')print(update_input_message_content(input=random_train_sample)[0]["content"])
Out [19]:
[INFO] Original content:
a few children use the child sized chairs for watching television television not shown in this photo

[INFO] New content with instructions in prompt:
Given the following target input text from an image caption, please extract the food and drink items to a list.
If there are no food or drink items, return an empty list.

Return in the following format:
food_items: [food_item_1, food_item_2, food_item_3]
drink_items: [drink_item_4, drink_item_5]

For example:
Input text: Hello my name is Daniel.
Output:
food_items: []
drink_items: []

Example 2:
Input text: A plate of rice cakes, salmon, cottage cheese and small cherry tomatoes with a cup of tea.
Output:
food_items: ['rice cakes', 'salmon', 'cottage cheese', 'cherry tomatoes']
drink_items: ['cup of tea']

Return only the formatted output and nothing else.

Target input text: a few children use the child sized chairs for watching television television not shown in this photo
5.8 Trying our formatted prompt with the model
Let’s pass our instructional based prompt formatted with our target sample to see if the model can extract details in the format we’d like.
In [20]:
# Apply the chat templateupdated_input_prompt = update_input_message_content(input=random_train_sample)input_prompt = pipe.tokenizer.apply_chat_template(conversation=updated_input_prompt, tokenize=False, add_generation_prompt=True)# Let's run the default model on our inputdefault_outputs = pipe(text_inputs=input_prompt, max_new_tokens=256)# View and compare the outputsprint(f"[INFO] Input:\n{input_prompt}\n")print(f"[INFO] Output:\n{default_outputs[0]['generated_text'][len(input_prompt):]}")
Out [20]:
[INFO] Input:
<bos><start_of_turn>user
Given the following target input text from an image caption, please extract the food and drink items to a list.
If there are no food or drink items, return an empty list.

Return in the following format:
food_items: [food_item_1, food_item_2, food_item_3]
drink_items: [drink_item_4, drink_item_5]

For example:
Input text: Hello my name is Daniel.
Output:
food_items: []
drink_items: []

Example 2:
Input text: A plate of rice cakes, salmon, cottage cheese and small cherry tomatoes with a cup of tea.
Output:
food_items: ['rice cakes', 'salmon', 'cottage cheese', 'cherry tomatoes']
drink_items: ['cup of tea']

Return only the formatted output and nothing else.

Target input text: a few children use the child sized chairs for watching television television not shown in this photo<end_of_turn>
<start_of_turn>model


[INFO] Output:
food_items: []
drink_items: []
Ok, for the following sample it looks like it kind of worked/kind of didn’t (note: the sample you see output may be different, I’m using the following one for an example).
The input was (instructional prompt, formatted with our raw text string):
<bos><start_of_turn>user
Given the following target input text from an image caption, please extract the food and drink items to a list.
If there are no food or drink items, return an empty list.

Return in the following format:
food_items: [food_item_1, food_item_2, food_item_3]
drink_items: [drink_item_4, drink_item_5]

For example:
Input text: Hello my name is Daniel.
Output:
food_items: []
drink_items: []

Example 2:
Input text: A plate of rice cakes, salmon, cottage cheese and small cherry tomatoes with a cup of tea.
Output:
food_items: ['rice cakes', 'salmon', 'cottage cheese', 'cherry tomatoes']
drink_items: ['cup of tea']

Return only the formatted output and nothing else.

Target input text: Granola Raspberry & Vanilla: Ingredients include Whole Grain Oats, Puffed Rice, Glucose, Golden Syrup, Raw Sugar, Puffed Brown Rice, Raspberry Pieces, Sunflower Oil, Natural Vanilla Flavour, Tapioca Starch, Natural Flavour, Sea Salt, Vitamin E. Contains Gluten. May contain Wheat, Barley, Rye, Peanut, Tree Nuts, Milk, Sesame, Lupin, Soy. Suitable for vegan diet. Nutrition Information: 8 servings per package, 45g per serving. Energy: 743kJ (177kcal), Protein: 3.5g, Fat: 4.4g (saturated: 0.6g), Carbohydrate: 29.2g (sugars: 7.2g), Dietary fibre: 3.3g, Sodium: 24mg. Store in cool, dry place out of direct sunlight. Price: $6.80.<end_of_turn>
<start_of_turn>model
In this case, our model extracted a fair few of the food names.
But it also pulled out the drink ['cup of tea'] from the example (this wasn’t in the input text).
This could be expected with such a small model.
Let’s look at our ideal inputs and outputs for our given sample.
In [21]:
random_train_sample
Out [21]:
{'sequence': 'a few children use the child sized chairs for watching television television not shown in this photo',
 'image_url': 'http://static.flickr.com/1040/668035563_90f3d8524b.jpg',
 'class_label': 'not_food',
 'source': 'qwen2vl_open_dataset',
 'char_len': 100.0,
 'word_count': 17.0,
 'syn_or_real': 'real',
 'uuid': '85e2961d-cdfd-4863-999a-4e23b660d479',
 'gpt-oss-120b-label': "{'is_food_or_drink': 'false', 'tags': [], 'food_items': [], 'drink_items': []}",
 'gpt-oss-120b-label-condensed': 'food_or_drink: 0\ntags: \nfoods: \ndrinks:',
 'target_food_names_to_use': None,
 'caption_detail_level': None,
 'num_foods': None,
 'target_image_point_of_view': None,
 'prompt': [{'content': 'a few children use the child sized chairs for watching television television not shown in this photo',
   'role': 'user'}],
 'completion': [{'content': 'food_or_drink: 0\ntags: \nfoods: \ndrinks:',
   'role': 'assistant'}]}
In [22]:
# This is our inputprint(f"[INFO] Raw text input:")print(random_train_sample["prompt"][0]["content"])print()# This is our ideal output: print(f"[INFO] Ideal extraction output:")print(random_train_sample["completion"][0]["content"])
Out [22]:
[INFO] Raw text input:
a few children use the child sized chairs for watching television television not shown in this photo

[INFO] Ideal extraction output:
food_or_drink: 0
tags:
foods:
drinks:
Your outputs might be different but continuing with the example we used above, we’d like ours to look like the following.
Raw input:
Granola Raspberry & Vanilla: Ingredients include Whole Grain Oats, Puffed Rice, Glucose, Golden Syrup, Raw Sugar, Puffed Brown Rice, Raspberry Pieces, Sunflower Oil, Natural Vanilla Flavour, Tapioca Starch, Natural Flavour, Sea Salt, Vitamin E. Contains Gluten. May contain Wheat, Barley, Rye, Peanut, Tree Nuts, Milk, Sesame, Lupin, Soy. Suitable for vegan diet. Nutrition Information: 8 servings per package, 45g per serving. Energy: 743kJ (177kcal), Protein: 3.5g, Fat: 4.4g (saturated: 0.6g), Carbohydrate: 29.2g (sugars: 7.2g), Dietary fibre: 3.3g, Sodium: 24mg. Store in cool, dry place out of direct sunlight. Price: $6.80.
And then we’d like our model to produce the following structured output:
food_or_drink: 1
tags: np, il, fi
foods: Granola Raspberry & Vanilla, Whole Grain Oats, Puffed Rice, Glucose, Golden Syrup, Raw Sugar, Puffed Brown Rice, Raspberry Pieces, Sunflower Oil, Natural Vanilla Flavour, Tapioca Starch, Natural Flavour, Sea Salt, Vitamin E, Wheat, Barley, Rye, Peanut, Tree Nuts, Milk, Sesame, Lupin, Soy
drinks:
After trying more random samples with our model, it looks like our prompt doesn’t reliably do what we’d like it to.
It starts to reply with Python text or it unreliably extracts foods and drinks from texts in a non-uniform format.
We could keep tweaking our prompt to get what we’d like or we could fine-tune the model to directly output the format we’re after.
But at only 270M parameters, our model may not have the capacity to handle large and specific input prompts.
I’ll leave prompt tweaking for your experimentation.
For now, let’s move onto fine-tuning.
6 Fine-tuning our model
Time to fine-tune our own model!
To do so, we’re going to need a couple of ingredients:
Data - we’ve got this!
A config - these will be the settings (often referred to as hyperparameters) to train our model, we’ll be using trl.SFTConfig for this.
A trainer - this will perform the optimization steps on our model using a combination of the data we pass it as well as the hyperparameters we pass it, we’ll be using trl.SFTTrainer for this.
SFT stands for Supervised Fine-tuning.
It means to teach to our model we are giving it examples of inputs and outputs.
As in, the outputs are the supervision of the inputs.
We’d like our model to learn to produce our target outputs given the inputs.
In supervised fine-tuning (SFT), you give the model examples of input data and the desired outputs you would like. The model learns to predict the outputs given the inputs. In our example, given an example piece of text, our model will learn to predict our desired output structure. Since language models are flexible, the inputs and outputs can be almost anything. Behind the scenes, these inputs and outputs will get represented numerically by our tokenizer. So while this image shows plain texts, our model will interpret and process both of these as sequences of tokens.
Note
To fine-tune our language model, we’ll be using Hugging Face’s TRL (Transformers Reinforcement Learning) library.
It offers many methods to train language models such as Supervised Fine-Tuning (SFT) as well as Group Relative Policy Optimization (GRPO).
For more on this, I’d suggest reading through the documentation for 30-60 minutes.
6.1 Setting up SFTConfig, the hyperparameters for our model training
There are many settings (often referred to as hyperparameters) in the SFTConfig, however, we’re going to focus on a few:
output_dir - This is where we’ll save our model/model checkpoints.
max_length - This is maximum length of tokens our model will accept as input, anything longer than this we will cut off.
num_train_epochs - This is the number of full passes we’ll do of the training data, generally a few enough is enough to teach our model what we need it to learn. If you have a rather complex token output pattern to learn, increasing this may help.
per_device_train_batch_size - How many samples our model will look at at a time. If this is too high, our GPU might error (or have an out of memory issue).
completion_only_loss=True - We want our model to only “complete” the structured output given the raw text input. So in this case, we want our model to only compute loss over the completion tokens rather than the input tokens.
optim - The optimizer we’d like to use to improve our model, in our case we’ll use adamw_torch_fused which is a fused version of the Adam optimizer.
learning_rate - We’ll set our learning rate to 5e-5 as I’ve found this to work experimentally, though you could try a different number here.
push_to_hub=False - We could automatically push our model to the Hugging Face Hub after training here but for now, we’ll push it to the Hugging Face Hub manually.
report_to=None - If we wanted to track our experiments with a service such as trackio or Weights & Biases, we could set that here.
load_best_model_at_end=True - We want to load our best model at the end of training.
metric_for_best_model="mean_token_accuracy" - Which metric would we like our “best model” to be measured by?
greater_is_better=True - Is the metric we’re measuring our “best model” on higher is better (e.g. accuracy) or lower is better (e.g. loss)?
I’ll leave the rest of the settings for exploration, there are many more to explore in the trl.SFTConfig documentation.
In [23]:
# Setting up our SFTConfigfrom trl import SFTConfigtorch_dtype = model.dtypeCHECKPOINT_DIR_NAME ="./checkpoint_models"BASE_LEARNING_RATE =5e-5BATCH_SIZE =16# Change this depending on the VRAM you have availableprint(f"[INFO] Using dtype: {torch_dtype}")print(f"[INFO] Using learning rate: {BASE_LEARNING_RATE}")# Setup SFTConfigsft_config = SFTConfig( output_dir=CHECKPOINT_DIR_NAME, max_length=512, # Captions/texts longer than this (in tokens) will be shortened to 512 packing=False, num_train_epochs=3, # Number of times our model will pass through all of the training data (you can alter this if you like) per_device_train_batch_size=BATCH_SIZE, # Note: you can change this depending on the amount of VRAM your GPU has per_device_eval_batch_size=BATCH_SIZE, completion_only_loss=True, # we want our model to only learn how to *complete* / generate the output tokens given the input tokens gradient_checkpointing=False, optim="adamw_torch_fused", # Note: if you try "adamw", you will get an error logging_steps=1, save_strategy="epoch", # Save our model every epoch eval_strategy="epoch", # Evaluate our model every epoch learning_rate=BASE_LEARNING_RATE, fp16=(torch_dtype == torch.float16), bf16=(torch_dtype == torch.bfloat16), load_best_model_at_end=True, metric_for_best_model="mean_token_accuracy", greater_is_better=True, lr_scheduler_type="constant", push_to_hub=False, # Optionally push our model directly to Hugging Face Hub report_to="none"# Optionally save our models training metrics to a logging service)# There are a lot of settings in the sft_config, so feel free to uncomment this and inspect it if you want# sft_config
Out [23]:
[INFO] Using dtype: torch.bfloat16
[INFO] Using learning rate: 5e-05
6.2 Setting up SFTTrainer, the conductor of our model training
Config setup, now we can train our model with trl.SFTTrainer!
We’ll pass in the following arguments:
model - The model instance we’d like to train.
args - The settings/hyperparameters we’d like our model to use for training, these were setup above in sft_config.
train_dataset - The training dataset we’d like our model to learn from, in our case, dataset["train"].
eval_dataset - The evaluation dataset we’d like to evaluate our model on, in our case, dataset["test"].
processing_class - The data proprocessor we’d like to pass our samples through to prepare them for the model, in our case, we’ll use the tokenizer to turn them into tokens before passing them to our model.
In [24]:
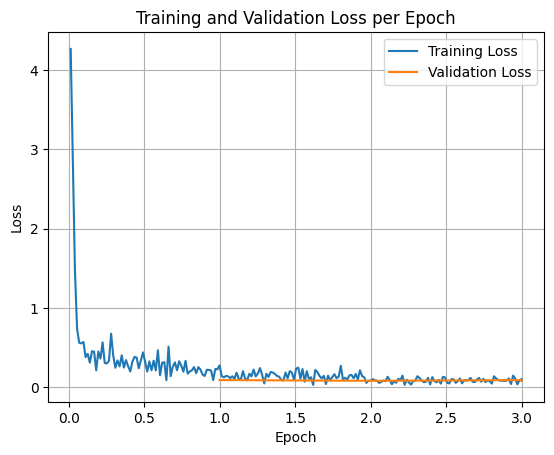
# Supervised Fine-Tuning = provide input and desired output samplesfrom trl import SFTTrainer# Create Trainer objecttrainer = SFTTrainer( model=model, args=sft_config, train_dataset=dataset["train"], eval_dataset=dataset["test"], processing_class=tokenizer )# Fine-tune our model and save the training artifacts training_ouput = trainer.train()
Out [24]:
The model is already on multiple devices. Skipping the move to device specified in `args`.
The tokenizer has new PAD/BOS/EOS tokens that differ from the model config and generation config. The model config and generation config were aligned accordingly, being updated with the tokenizer's values. Updated tokens: {'bos_token_id': 2, 'pad_token_id': 0}.
[213/213 06:08, Epoch 3/3]
Epoch
Training Loss
Validation Loss
Entropy
Num Tokens
Mean Token Accuracy
1
0.274000
0.088337
1.652664
170969.000000
0.978223
2
0.077000
0.078869
1.473278
341938.000000
0.982157
3
0.100400
0.088000
1.270300
512907.000000
0.981821
There were missing keys in the checkpoint model loaded: ['lm_head.weight'].
Note
Don’t worry if the numbers on your end aren’t the exact same as what we’ve got here. This is due to the natural randomness of machine learning.
The direction here is more important.
As in, does your training loss head downward? If so, your model is likely learning!
6.3 Evaluating our fine-tuned model
We can evaluate our model within the trainer instance using trainer.evaluate.
This will run our model across the eval_dataset (we set this to be dataset["test"]) and record metrics.
Nice! Looks like our model is performing quite well from a mean token accuracy point of view.
We can also inspect our best model’s performance metric with trainer.state.best_metric.
In [26]:
print(f"[INFO] Our model's mean token accuracy: {trainer.state.best_metric*100:.2f}%")
Out [26]:
[INFO] Our model's mean token accuracy: 98.22%
Remember that this metric includes the actual tokens output by our model, including the format specific tokens.
So our model’s accuracy metric will go up when it generates the token food: or drink: correctly, the number goes up. Every correctly generated token contributes to the accuracy. We can inspect field-level token performance metrics (e.g. which specific food_items were generated) later on.
6.4 Inspect our model’s loss curves
Woohoo! Looks like mean token accuracy went up and our loss values trended down.
Let’s inspect the loss curves, we can do so by extracting the values from the trainer.state.log_history attribute.
In [27]:
import matplotlib.pyplot as plt# Access the log historylog_history = trainer.state.log_history# Extract training / validation losstrain_losses = [log["loss"] for log in log_history if"loss"in log]epoch_train = [log["epoch"] for log in log_history if"loss"in log]eval_losses = [log["eval_loss"] for log in log_history if"eval_loss"in log]epoch_eval = [log["epoch"] for log in log_history if"eval_loss"in log]# Plot the training lossplt.plot(epoch_train, train_losses, label="Training Loss")plt.plot(epoch_eval, eval_losses, label="Validation Loss")plt.xlabel("Epoch")plt.ylabel("Loss")plt.title("Training and Validation Loss per Epoch")plt.legend()plt.grid(True)plt.show()
When we upload our model to Hugging Face, a typical practice is to upload a certain folder (e.g. checkpoint_models/) including all the contents so we get the artifacts such as config.json, generation_config.json, tokenizer.json and more.
However, if we’ve got a large number of checkpoints from a training run, this could lead to uploading too many files.
Perhaps we don’t want to upload the checkpoint-XXX files and only the remaining files such as model.safetensors.
Let’s remove the checkpoint_models/checkpoint-XXX/ files and their contents.
In [30]:
# Optional: Remove all the checkpoint folders (since we've already saved the best model)!rm -rf ./checkpoint_models/checkpoint-*/*!rm -rf ./checkpoint_models/checkpoint-*
Let’s load our fine-tuned model back in and inspect its performance on the test dataset and if it goes well, we’ll upload it to the Hugging Face Hub.
7 Load the trained model back in and see how it performs
We’ve now fine-tuned our own Gemma 3 270M to do a specific food and drink extraction task, let’s load it back in and see how it performs.
In [32]:
# Load the fine-tuned model and see how it goesfrom transformers import AutoTokenizer, AutoModelForCausalLMCHECKPOINT_DIR_NAME ="./checkpoint_models"print(f"[INFO] Loading in model from: {CHECKPOINT_DIR_NAME}")# Load tokenizertokenizer = AutoTokenizer.from_pretrained( pretrained_model_name_or_path=CHECKPOINT_DIR_NAME,)# Load trained modelloaded_model = AutoModelForCausalLM.from_pretrained( pretrained_model_name_or_path=CHECKPOINT_DIR_NAME, dtype="auto", device_map="auto", attn_implementation="eager");# Check our loaded model (it's the same architecture as before except this time with updated weights)loaded_model
Out [32]:
[INFO] Loading in model from: ./checkpoint_models
The tokenizer you are loading from './checkpoint_models' with an incorrect regex pattern: https://huggingface.co/mistralai/Mistral-Small-3.1-24B-Instruct-2503/discussions/84#69121093e8b480e709447d5e. This will lead to incorrect tokenization. You should set the `fix_mistral_regex=True` flag when loading this tokenizer to fix this issue.
Now let’s create a "text-generation" pipeline by loading our loaded_model into a pipeline.
In [33]:
from transformers import pipelineloaded_model_pipeline = pipeline("text-generation", model=loaded_model, tokenizer=tokenizer)loaded_model_pipeline
Out [33]:
Device set to use cuda:0
<transformers.pipelines.text_generation.TextGenerationPipeline at 0xe58321dc5640>
7.1 Performing inference with our fine-tuned model on the test dataset
Let’s now perform inference with our fine-tuned model on a random sample from the test dataset, dataset["test"] (our model has never seen these samples).
If our model training went well, the outputs of our fine-tuned model should be aligned with the ground truth labels.
In [34]:
# Get a random sampleimport randomrandom_test_idx = random.randint(0, len(dataset["test"])-1)random_test_sample = dataset["test"][random_test_idx]# Apply the chat templateinput_prompt = loaded_model_pipeline.tokenizer.apply_chat_template(conversation=random_test_sample["prompt"], tokenize=False, add_generation_prompt=True)# Let's run the default model on our inputdefault_outputs = loaded_model_pipeline(text_inputs=input_prompt, max_new_tokens=256)# View and compare the outputsprint(f"[INFO] Test sample input:\n{input_prompt}\n")print(f"[INFO] Fine-tuned model output:\n{default_outputs[0]['generated_text'][len(input_prompt):]}\n")print(f"[INFO] Test label (ideal output):\n{random_test_sample['gpt-oss-120b-label-condensed']}")
Out [34]:
[INFO] Test sample input:
<bos><start_of_turn>user
The image shows a package of "Helpful Harvest" dried vegetables. The ingredients include a variety of vegetables such as zucchini, carrots, mushrooms, onions, capsicum, and celery. The product is made from 100% vegetables and includes wonky and overly abundant produce where possible. The package notes that the ingredients and percentages may differ due to seasonal availability.

The allergens listed are milk, eggs, soy, sesame seeds, hazelnuts, pistachios, cashews, and almonds. The nutrition information indicates that the package contains 4 servings, with each serving size being 10g. The average quantities per serving are as follows:
- Energy: 125 kJ
- Protein: 1.9 g
- Gluten: 0 g (marked as gluten-free)
- Fat, total: 0.3 g
- Saturated fat: 0 g
- Carbohydrate: 3.4 g
- Sugars: 3.4 g
- Fibre: 3.4 g
- Sodium: 2.1 g

The average quantities per 100g are:
- Energy: 1250 kJ
- Protein: 18.7 g
- Fat, total: 2.8 g
- Saturated fat: 0 g
- Carbohydrate: 34.3 g
- Sugars: 34.3 g
- Fibre: 20.9 g
- Sodium: 282 mg

The package also mentions that 10g dry is equivalent to approximately 75-100g fresh when rehydrated, and each serve is a minimum of 1 adult serve of vegetables. The product is gluten-free, as indicated by a handwritten note on the package.<end_of_turn>
<start_of_turn>model


[INFO] Fine-tuned model output:
food_or_drink: 1
tags: np, il, fi, fp
foods: Vegetables, zucchini, carrots, mushrooms, onions, capsicum, celery, milk, eggs, soy, sesame seeds, hazelnuts, pistachios, cashews, almonds, nutrition
drinks:

[INFO] Test label (ideal output):
food_or_drink: 1
tags: np, il, fi, fp
foods: zucchini, carrots, mushrooms, onions, capsicum, celery, milk, eggs, soy, sesame seeds, hazelnuts, pistachios, cashews, almonds
drinks:
Nice!! Looks like our fine-tuned model is doing quite well to reproduce the target labels.
We could keep going here and inspect the predictions against the ground truth (in fact, I’d encourage you to sample at least 25 different test items and inspect them), however, let’s now upload our model to the Hugging Face Hub so it’s reusable.
7.2 Attempt 2: Testing our model on unformatted text
Machine learning models often want to predict on data in the same format they’ve been trained on.
For example, our model is capable of making predictions on raw text, however, it was trained to do food and drink extraction specifically on formatted text.
In [35]:
# Test the loaded model on raw text (this won't work as well as formatted text)test_input_message_without_formatting ="Hello my name is Daniel!"loaded_model_pipeline(test_input_message_without_formatting)
Out [35]:
[{'generated_text': 'Hello my name is Daniel! \nfood_or_drink: 0\ntags: \nfoods: \ndrinks:'}]
Notice the model generates the same input?
What happens if we format the input?
Let’s create a helper function to format our input text into message format.
'<bos><start_of_turn>user\nHello my name is Daniel!<end_of_turn>\n<start_of_turn>model\n'
Now our test input has been formatted in a style that our model has been trained on, let’s test it and see how it goes.
In [38]:
loaded_model_outputs = loaded_model_pipeline(text_inputs=input_prompt, max_new_tokens=256)# View and compare the outputsprint(f"[INFO] Input:\n{input_prompt}\n")print(f"[INFO] Output:\n{loaded_model_outputs[0]['generated_text'][len(input_prompt):]}")
Out [38]:
[INFO] Input:
<bos><start_of_turn>user
Hello my name is Daniel!<end_of_turn>
<start_of_turn>model


[INFO] Output:
food_or_drink: 0
tags:
foods:
drinks:
Excellent! Our model outputs in the exact format we were looking for! It no longer regenerates the input as it did before.
Tip
The takeaway here is: if your model has been trained/fine-tuned on data in a certain format, when doing inference, always pass in data to the model in the same format its been trained on.
Otherwise, you’ll likely get strange or incorrect outputs.
7.3 Making a helper function to precict on any given sample
Okay let’s make another helper function to predict on any given sample input.
We’ll also return the inference time of our model so we can see how long things take (a working model is one thing but if it takes too long, well then it might not be as useful as we’d like).
In [39]:
import timedef pred_on_text(input_text): start_time = time.time() raw_output = loaded_model_pipeline(text_inputs=[{"role": "user","content": input_text}], max_new_tokens=256, disable_compile=True) end_time = time.time() total_time =round(end_time - start_time, 4) generated_text = raw_output[0]["generated_text"][1]["content"]return generated_text, raw_output, total_timeexample_input_text ="British Breakfast with baked beans, fried eggs, black pudding, sausages, bacon, mushrooms, a cup of tea and toast and fried tomatoes"output_text, output_raw, output_total_time = pred_on_text(input_text=example_input_text)print(f"[INFO] Input text:\n{example_input_text}\n")print(f"[INFO] Model generated output text:\n{output_text}\n")print(f"[INFO] Model full raw output:\n{output_raw}\n")print(f"[INFO] Inference time:\n{output_total_time}\n")
Out [39]:
[INFO] Input text:
British Breakfast with baked beans, fried eggs, black pudding, sausages, bacon, mushrooms, a cup of tea and toast and fried tomatoes

[INFO] Model generated output text:
food_or_drink: 1
tags: fi, di
foods: British Breakfast, baked beans, fried eggs, black pudding, sausages, bacon, mushrooms, toast, fried tomatoes
drinks: tea

[INFO] Model full raw output:
[{'generated_text': [{'role': 'user', 'content': 'British Breakfast with baked beans, fried eggs, black pudding, sausages, bacon, mushrooms, a cup of tea and toast and fried tomatoes'}, {'role': 'assistant', 'content': 'food_or_drink: 1\ntags: fi, di\nfoods: British Breakfast, baked beans, fried eggs, black pudding, sausages, bacon, mushrooms, toast, fried tomatoes\ndrinks: tea'}]}]

[INFO] Inference time:
0.6492
Outstanding!
Looks like our model is working well enough (of course we could always improve it over time with more testing and different samples).
Let’s upload it to the Hugging Face Hub.
8 Uploading our fine-tuned model to the Hugging Face Hub
Uploading our fine-tuned model to the Hugging Face Hub means we can easily load it in to another environment later on or share it with others so they can test it out.
Let’s start by creating a repo, I’m going to call mine mrdbourke/FoodExtract-gemma-3-270m-fine-tune-v1.
My username for Hugging Face is mrdbourke so be sure to change it to your own.
In [40]:
from huggingface_hub import HfApi, create_repoapi = HfApi()# Change this to your own HF_USERNAME ="mrdbourke"# Create the repo (this is in the format [Hugging Face Username]/[Target Model Name])repo_id =f"{HF_USERNAME}/FoodExtract-gemma-3-270m-fine-tune-v1"# Create the repocreate_repo(repo_id, repo_type="model", private=False, # optionally make the repo private if you'd like to upload sensitive information exist_ok=True)
model_readme =r"""---base_model: google/gemma-3-270m-itlibrary_name: transformersmodel_name: checkpoint_modelstags:- generated_from_trainer- sft- trllicense: gemma---# FoodExtract-v1This is a food and drink extraction language model built on [Gemma 3 270M](https://huggingface.co/google/gemma-3-270m-it).Given raw text, it's designed to:1. Classify the text into food or drink (e.g. "a photo of a dog" = not food or drink, "a photo of a pizza" = food or drink).2. Tag the text with one or more tags (see tags_dict below).3. Extract the edible food-related items as a list.4. Extract the edible drink-related items as a list.For example, the input text might be:```British Breakfast with baked beans, fried eggs, black pudding, sausages, bacon, mushrooms, a cup of tea and toast and fried tomatoes```And the model will generate:```food_or_drink: 1tags: fi, difoods: British Breakfast, baked beans, fried eggs, black pudding, sausages, bacon, mushrooms, toast, fried tomatoesdrinks: tea```This model can be used for filtering a large image caption (e.g.[DataComp-1B](https://huggingface.co/datasets/UCSC-VLAA/Recap-DataComp-1B)) text dataset for food and drink related items.## DatasetThe model was trained on the [FoodExtract-1k](https://huggingface.co/datasets/mrdbourke/FoodExtract-1k) dataset.This dataset contains 1400 samples of raw text and JSON output pairs of structured food extractions provided by `gpt-oss-120b`.For example, a raw image caption input might be:```another optional quest takes place on windfall island during the night time play the song of passing a number of times and each time, glance towards the sky```And the `gpt-oss-120b` generated output (JSON) would be:```{'is_food_or_drink': 'false', 'tags': [], 'food_items': [], 'drink_items': []}```This is condensed to:```food_or_drink: 0\ntags: \nfoods: \ndrinks:```### Tags dictionary mappingThese tags are designed for fast filtering.For example, the model can assign a certain tag based on what's in the raw text and then we can filter for "ingredient list" items.```tags_dict = {'np': 'nutrition_panel', 'il': 'ingredient list', 'me': 'menu', 're': 'recipe', 'fi': 'food_items', 'di': 'drink_items', 'fa': 'food_advertistment', 'fp': 'food_packaging'}```## Helper functionsThe model is trained to output a condensed version of the structured data.We do this so the model can generate less tokens (e.g. it doesn't have to generate JSON outputs).The following functions help to condense and uncondense raw text outputs/inputs into the desired structure.```pythondef condense_output(original_output): '''Helper function to condense a given FoodExtract string. Example input: {'is_food_or_drink': True, 'tags': ['fi'], 'food_items': ['cape gooseberries', 'mulberry', 'chilli powder', 'flathead lobster', 'hoisin sauce', 'duck leg', 'chestnuts', 'raw quail', 'duck breast', 'rogan josh curry sauce', 'brown rice', 'dango'], 'drink_items': []} Example output: food_or_drink: 1\ntags: fi\nfoods: cape gooseberries, mulberry, chilli powder, flathead lobster, hoisin sauce, duck leg, chestnuts, raw quail, duck breast, rogan josh curry sauce, brown rice, dango\ndrinks:''' condensed_output_string_base = '''food_or_drink: <is_food_or_drink> tags: <output_tags> foods: <food_items> drinks: <drink_items>''' is_food_or_drink = str(1) if str(original_output["is_food_or_drink"]).lower() == "true" else str(0) tags = ", ".join(original_output["tags"]) if len(original_output["tags"]) > 0 else "" foods = ", ".join(original_output["food_items"]) if len(original_output["food_items"]) > 0 else "" drinks = ", ".join(original_output["drink_items"]) if len(original_output["drink_items"]) > 0 else "" condensed_output_string_formatted = condensed_output_string_base.replace("<is_food_or_drink>", is_food_or_drink).replace("<output_tags>", tags).replace("<food_items>", foods).replace("<drink_items>", drinks) return condensed_output_string_formatted.strip()def uncondense_output(condensed_output): '''Helper to go from condensed output to uncondensed output. Example input: food_or_drink: 1\ntags: fi\nfoods: cape gooseberries, mulberry, chilli powder, flathead lobster, hoisin sauce, duck leg, chestnuts, raw quail, duck breast, rogan josh curry sauce, brown rice, dango\ndrinks: Example output: {'is_food_or_drink': True, 'tags': ['fi'], 'food_items': ['cape gooseberries', 'mulberry', 'chilli powder', 'flathead lobster', 'hoisin sauce', 'duck leg', 'chestnuts', 'raw quail', 'duck breast', 'rogan josh curry sauce', 'brown rice', 'dango'], 'drink_items': []} ''' condensed_list = condensed_output.split("\n") condensed_dict_base = { "is_food_or_drink": "", "tags": [], "food_items": [], "drink_items": [] }# Set values to defaults food_or_drink_item = None tags_item = None foods_item = None drinks_item = None# Extract items from condensed_list for item in condensed_list: if "food_or_drink:" in item.strip(): food_or_drink_item = item if "tags:" in item: tags_item = item if "foods:" in item: foods_item = item if "drinks:" in item: drinks_item = item if food_or_drink_item: is_food_or_drink_bool = True if food_or_drink_item.replace("food_or_drink: ", "").strip() == "1" else False else: is_food_or_drink_bool = None if tags_item: tags_list = [item.replace("tags: ", "").replace("tags:", "").strip() for item in tags_item.split(", ")] tags_list = [item for item in tags_list if item]# Filter for empty items else: tags_list = [] if foods_item: foods_list = [item.replace("foods:", "").replace("foods: ", "").strip() for item in foods_item.split(", ")] foods_list = [item for item in foods_list if item]# Filter for empty items else: foods_list = [] if drinks_item: drinks_list = [item.replace("drinks:", "").replace("drinks: ", "").strip() for item in drinks_item.split(", ")] drinks_list = [item for item in drinks_list if item]# Filter for empty items else: drinks_list = [] condensed_dict_base["is_food_or_drink"] = is_food_or_drink_bool condensed_dict_base["tags"] = tags_list condensed_dict_base["food_items"] = foods_list condensed_dict_base["drink_items"] = drinks_list return condensed_dict_base````## Quick start```pythonfrom transformers import AutoModelForCausalLM, AutoTokenizer, pipelineMODEL_PATH = "mrdbourke/FoodExtract-gemma-3-270m-fine-tune-v1"# Load the model into a pipelineloaded_model = AutoModelForCausalLM.from_pretrained( pretrained_model_name_or_path=MODEL_PATH, dtype="auto", device_map="auto", attn_implementation="eager")# Load the tokenizertokenizer = AutoTokenizer.from_pretrained( pretrained_model_name_or_path=MODEL_PATH,)# Create model pipelineloaded_model_pipeline = pipeline("text-generation", model=loaded_model, tokenizer=tokenizer)# Create a sample to predict oninput_text = "A plate with bacon, eggs and toast on it"input_text_user = [{'content': input_text, 'role': 'user'}]# Apply the chat templateinput_prompt = loaded_model_pipeline.tokenizer.apply_chat_template(conversation=input_text_user, tokenize=False, add_generation_prompt=True)# Let's run the default model on our inputdefault_outputs = loaded_model_pipeline(text_inputs=input_prompt, max_new_tokens=256)# View the outputsprint(f"[INFO] Test sample input:\n{input_prompt}\n")print(f"[INFO] Fine-tuned model output:\n{default_outputs[0]['generated_text'][len(input_prompt):]}\n")```You should see an output similar to:```[INFO] Test sample input:<bos><start_of_turn>userA plate with bacon, eggs and toast on it<end_of_turn><start_of_turn>model[INFO] Fine-tuned model output:food_or_drink: 1tags: fifoods: bacon, eggs, toastdrinks:```## Training procedureThis model was trained with SFT (Supervised Fine-Tuning) via Hugging Face's TRL library.See the full training walkthrough at: https://www.learnhuggingface.com/notebooks/hugging_face_llm_full_fine_tune_tutorial## Citations* Reference for structured data extraction was taken from the paper [*Essential-Web v1.0: 24T tokens of organized web data*](https://huggingface.co/papers/2506.14111) and the subsequent fine-tuned model [`EssentialAI/eai-distill-0.5b`](https://huggingface.co/EssentialAI/eai-distill-0.5b)."""# Save README to filewithopen(f"{CHECKPOINT_DIR_NAME}/README.md", "w") as f: f.write(model_readme)
8.2 Upload the contents of our checkpoint model folder to the Hugging Face Hub
Now we’ve created a model repository (repo for short) and model card, let’s upload our checkpoint_models/ folder contents to the Hugging Face Hub.
This may take a few minutes depending on your internet connection.
In [42]:
# Upload the entire model folder containing our model files and README.mdprint(f"[INFO] Uploading checkpoint directory: {CHECKPOINT_DIR_NAME} to Hugging Face repo: {repo_id}")api.upload_folder( folder_path="./checkpoint_models/", repo_id=repo_id, repo_type="model")
Out [42]:
[INFO] Uploading checkpoint directory: ./checkpoint_models to Hugging Face repo: mrdbourke/FoodExtract-gemma-3-270m-fine-tune-v1
Woohoo! Our model is officially on the Hugging Face Hub.
You can download it and view the model card here: https://huggingface.co/mrdbourke/FoodExtract-gemma-3-270m-fine-tune-v1/ (note: change to your own username if you’d like to see your own model).
A Model Card is similar to a README.md file. It’s a place to communicate details about your model including what it does, how it was trained and how to use it. On Hugging Face, the model page also shows the Model ID you can copy and use in various workflows. Adding details to your model card is a helpful way to communicate to others (and your future self) the most important information about your model.
Now not only can we redownload it and use it again, others can download it and use it for themselves (of course you can make the model private if you like too).
9 Turning our model into a demo
Right now our model seems to be working quite well for our specific use case.
However, it takes some coding to be able to use it.
What if we wanted to allow someone who wasn’t familiar with programming to try it out?
To do so, we can turn our model into a Gradio demo and upload it to Hugging Face Spaces (a place to share all kinds of small applications).
Gradio allows us to turn our model into an easy to use and sharable demo anyone can try.
Gradio demos work on the premise of:
input (text) -> function (our model) -> output (text)
We’ve already go a function ready with pred_on_text so we can wrap this with some Gradio code.
To create a sharable demo, we’ll need the following files:
app.py - Entry point for our app, all of our application code will go in here.
README.md - Tells people what our app does.
Note: Hugging Face Spaces use a special “front matter” (text at the start of a README.md file) to add various attributes to a Hugging Face Space, we’ll see this below.
requirements.txt - Tells Hugging Face Spaces what our app requires.
torch, transformers, gradio, accelerate
Let’s make a folder to store our demo application.
huggingface/tokenizers: The current process just got forked, after parallelism has already been used. Disabling parallelism to avoid deadlocks...
To disable this warning, you can either:
    - Avoid using `tokenizers` before the fork if possible
    - Explicitly set the environment variable TOKENIZERS_PARALLELISM=(true | false)
9.1 Creating the app.py file
When running our app on Hugging Face Spaces, we have the option to run our model on a GPU thanks to Hugging Face’s ZeroGPU feature.
This is optional, however, it’s highly recommend you run a model such as Gemma 3 270M on a GPU as we’ll see significant speedups as compared to running on CPU.
You can run a function on a GPU by importing spaces and then using the @spaces.GPU decorator on your target function.
To ensure your model runs on the GPU, be sure to select a ZeroGPU instance in your Hugging Face Space settings.
Most modern models will often see speedup benefits from using a GPU. A very nice feature of Hugging Face Spaces is the ability to select the ZeroGPU option in the settings. This allocates a GPU to your Hugging Face Space from a shared pool of GPU resources. If you are a PRO user, you get even more access. See the ZeroGPU documentation for more information.
%%writefile demos/FoodExtract/app.py# Load dependenciesimport timeimport transformersimport torchimport spaces # Optional: run our model on the GPU (this will be much faster inference)import gradio as grfrom transformers import AutoModelForCausalLM, AutoTokenizerfrom transformers import pipeline@spaces.GPU# Optional: run our model on the GPU (this will be much faster inference)def pred_on_text(input_text): start_time = time.time() raw_output = loaded_model_pipeline(text_inputs=[{"role": "user","content": input_text}], max_new_tokens=256, disable_compile=True) end_time = time.time() total_time =round(end_time - start_time, 4) generated_text = raw_output[0]["generated_text"][1]["content"]return generated_text, raw_output, total_time# Load the model (from our Hugging Face Repo)# Note: You may have to replace my username `mrdbourke` for your ownMODEL_PATH ="mrdbourke/FoodExtract-gemma-3-270m-fine-tune-v1"# Load the model into a pipelineloaded_model = AutoModelForCausalLM.from_pretrained( pretrained_model_name_or_path=MODEL_PATH, dtype="auto", device_map="auto", attn_implementation="eager")# Load the tokenizertokenizer = AutoTokenizer.from_pretrained( pretrained_model_name_or_path=MODEL_PATH,)# Create model pipelineloaded_model_pipeline = pipeline("text-generation", model=loaded_model, tokenizer=tokenizer)# Create the demodescription ="""Extract food and drink items from text with a fine-tuned SLM (Small Language Model) or more specifically a fine-tuned [Gemma 3 270M](https://huggingface.co/google/gemma-3-270m-it).Our model has been fine-tuned on the [FoodExtract-1k dataset](https://huggingface.co/datasets/mrdbourke/FoodExtract-1k). * Input (str): Raw text strings or image captions (e.g. "A photo of a dog sitting on a beach" or "A breakfast plate with bacon, eggs and toast")* Output (str): Generated text with food/not_food classification as well as noun extracted food and drink items and various food tags.For example:* Input: "For breakfast I had eggs, bacon and toast and a glass of orange juice"* Output: ```food_or_drink: 1tags: fi, difoods: eggs, bacon, toastdrinks: orange juice```See full fine-tuning code at [learnhuggingface.com](https://www.learnhuggingface.com/notebooks/hugging_face_llm_full_fine_tune_tutorial)."""# Create the Gradio text in and out interfacedemo = gr.Interface(fn=pred_on_text, inputs=gr.TextArea(lines=4, label="Input Text"), outputs=[gr.TextArea(lines=4, label="Generated Text"), gr.TextArea(lines=7, label="Raw Output"), gr.Number(label="Generation Time (s)")], title="🍳 Structured FoodExtract with a Fine-Tuned Gemma 3 270M", description=description, examples=[["Hello world! This is my first fine-tuned LLM!"], ["A plate of food with grilled barramundi, salad with avocado, olives, tomatoes and Italian dressing"], ["British Breakfast with baked beans, fried eggs, black pudding, sausages, bacon, mushrooms, a cup of tea and toast and fried tomatoes"], ["Steak tacos"], ["A photo of a dog sitting on a beach"]])if__name__=="__main__": demo.launch(share=False)
Writing demos/FoodExtract/app.py
9.2 Create the README.md file
The README.md file will tell people what our app does.
We could add more information here if we wanted to but for now we’ll keep it simple.
Notice the special text at the top of the file below (the text between the ---), these are some settings for the Space, you can see the settings for these in the docs.
In [44]:
%%writefile demos/FoodExtract/README.md---title: FoodExtract Fine-tuned LLM Structued Data Extractor v1emoji: 📝➡️🍟colorFrom: greencolorTo: bluesdk: gradioapp_file: app.pypinned: falselicense: apache-2.0---"""Fine-tuned Gemma 3 270M to extract food and drink items from raw text.Input can be any form of real text (mostly focused on shorter image caption-like texts):```A truly eclectic and mouth-watering feast is laid out on the table, featuring savory favorites like crispy fried chicken, a perfectly seared steak, and loaded tacos, complete with a side of creamy mayonnaise. To balance the heavier mains, a vibrant assortment of fresh fruit sits nearby, including a crisp red apple, a tropical pineapple, and a scattering of sweet cherries. Thirst-quenching options complete this extravagant spread, with a classic iced latte, an earthy matcha latte, and a simple, refreshing glass of milk ready to be enjoyed.```And output will be a formatted string such as the following:```food_or_drink: 1tags: fi, refoods: tacos,red apple, pineapple, cherries, fried chicken, steak, mayonnaisedrinks: iced latte, matcha latte, milk```The tags map to the following items:```tags_dict = {'np': 'nutrition_panel', 'il': 'ingredient list', 'me': 'menu', 're': 'recipe', 'fi': 'food_items', 'di': 'drink_items', 'fa': 'food_advertistment', 'fp': 'food_packaging'}```* You can see walkthrough step by step code details at: https://www.learnhuggingface.com/notebooks/hugging_face_llm_full_fine_tune_tutorial * See the fine-tuning dataset: https://huggingface.co/datasets/mrdbourke/FoodExtract-1k* See the fine-tuned model: https://huggingface.co/mrdbourke/FoodExtract-gemma-3-270m-fine-tune-v1"""
Out [44]:
Overwriting demos/FoodExtract/README.md
9.3 Creating a requirements.txt file
This will tell the Hugging Face Space what libraries we’d like it to run inside.
We can upload our demo to the Hugging Face Hub in a similar way to uploading our model.
We could also upload it file by file via the Hugging Face Spaces interface.
But let’s stick to the code-first approach.
To do so, we’ll:
Import the required huggingface_hub methods for uploading to the Hugging Face Hub.
Define the parameters we’d like to use for the upload.
Create a "space" repository on the Hugging Face Hub using create_repo.
Get the full repository name using get_full_repo_name, we can use this for uploading a target folder.
Upload our target demo folder with our app.py, requirements.txt and README.md file to our target repository.
In [46]:
# 1. Import the required methods for uploading to the Hugging Face Hubfrom huggingface_hub import ( create_repo, get_full_repo_name, upload_file, # for uploading a single file (if necessary) upload_folder # for uploading multiple files (in a folder))# 2. Define the parameters we'd like to use for the uploadLOCAL_DEMO_FOLDER_PATH_TO_UPLOAD ="demos/FoodExtract/"HF_TARGET_SPACE_NAME ="FoodExtract-v1"HF_REPO_TYPE ="space"# we're creating a Hugging Face SpaceHF_SPACE_SDK ="gradio"HF_TOKEN =""# optional: set to your Hugging Face token (but I'd advise storing this as an environment variable as previously discussed)# 3. Create a Space repository on Hugging Face Hub print(f"[INFO] Creating repo on Hugging Face Hub with name: {HF_TARGET_SPACE_NAME}")create_repo( repo_id=HF_TARGET_SPACE_NAME,# token=HF_TOKEN, # optional: set token manually (though it will be automatically recognized if it's available as an environment variable) repo_type=HF_REPO_TYPE, private=False, # set to True if you don't want your Space to be accessible to others space_sdk=HF_SPACE_SDK, exist_ok=True, # set to False if you want an error to raise if the repo_id already exists )# 4. Get the full repository name (e.g. {username}/{model_id} or {username}/{space_name})full_hf_repo_name = get_full_repo_name(model_id=HF_TARGET_SPACE_NAME)print(f"[INFO] Full Hugging Face Hub repo name: {full_hf_repo_name}")# 5. Upload our demo folderprint(f"[INFO] Uploading {LOCAL_DEMO_FOLDER_PATH_TO_UPLOAD} to repo: {full_hf_repo_name}")folder_upload_url = upload_folder( repo_id=full_hf_repo_name, folder_path=LOCAL_DEMO_FOLDER_PATH_TO_UPLOAD, path_in_repo=".", # upload our folder to the root directory ("." means "base" or "root", this is the default)# token=HF_TOKEN, # optional: set token manually repo_type=HF_REPO_TYPE, commit_message="Uploading FoodExtract demo app.py")print(f"[INFO] Demo folder successfully uploaded with commit URL: {folder_upload_url}")
Out [46]:
[INFO] Creating repo on Hugging Face Hub with name: FoodExtract-v1
[INFO] Full Hugging Face Hub repo name: mrdbourke/FoodExtract-v1
[INFO] Uploading demos/FoodExtract/ to repo: mrdbourke/FoodExtract-v1
[INFO] Demo folder successfully uploaded with commit URL: https://huggingface.co/spaces/mrdbourke/FoodExtract-v1/tree/main/.
Nice!
It looks like our demo upload worked!
9.5 Trying our demo right from within our notebook
And we can even embed it right in our notebook by going to the three dots on the Hugging Face Space and then clicking “Embed this Space”.
In [48]:
from IPython.display import HTMLhtml_code ="""<iframe src="https://mrdbourke-foodextract-v1.hf.space" frameborder="0" width="850" height="1000"></iframe>"""display(HTML(html_code))
Out [48]:
How cool!
We’ve now got a sharable demo of a fine-tuned LLM which anyone can try out for themselves.
10 Summary
Congratulations!
You’ve now officially fine-tuned your own SLM for structured data extraction!
We’ve come a long way from the base Gemma 3 270M model, fine-tuning it on our custom dataset and then evaluating it for our specific task.
We’ve now got a fine-tuned model artifact we could share with others and re-use over and over again.
We’ve also got a Hugging Face Space with a demo application running that we could share with others to easily try out our model.
The data -> model -> demo workflow is complete!
One of the biggest takeaways is that language models (large and small) operate on the premise of tokens in and tokens out.
This means, if you can get the right input tokens (image captions in our case) and desired output tokens (structured extracted food data) lined up, you can likely find a way to train a model to repeat the process.
10.1 Extensions
Our model works quite well for our given task.
However, if we wanted to improve the overall workflow, there are several avenues we could explore next.
Improve/increase the data sampling - If our model makes mistakes, one of the strongest levers we have to fix this is to improve the input data. For example, more samples on certain tasks where the model is weaker. I’ve gone ahead and done this by creating mrdbourke/FoodExtract-135k, a dataset which is ~80x larger than the one we used in this notebook. The resulting fine-tuned model (mrdbourke/FoodExtract-gemma-3-270m-fine-tune-v2) uses the same base model (Gemma 3 270M), however it has now seen far more samples. You can see the demo at mrdbourke/FoodExtract-v2.
Quantization - Right now our model is ~500MB in torch.bfloat16 precision. Are there quantization options which we could use to make the model smaller and more memory efficient? I’d try searching for “gemma 3 270m quantization techniques”.
Output compression/decompression - Currently, our model is trained to produce a compressed YAML-like format. But is there a better compression option to generate even less tokens (and speeding up inference)? Or perhaps we could decompress the outputs such as the tags (e.g. re -> recipe) so the model generates full tags and perhaps gets a more accurate representation? If you’re going to be training models to generate a specific output, it’s worth considering how the output could be best tailored to your setting.
Test the model on a large unseen sample dataset - We’ve tested our model on the test dataset (samples our model never saw during training), perhaps we’d like to test our model on a larger corpus? You could find a large dataset (such as DataComp-1B) and try our model across a large sample, say 10,000+ captions and see how it performs on those. If there are any noticable failure cases, you could try and add those samples back into the training data and improve the model in the next run. For an example of the the FoodExtract model running in the wild, see the mrdbourke/Recap-DataComp-1B-FoodOrDrink dataset I’m working on for filtering a large 1 billion+ sample dataset specifically for food/drink images and items.
Try an inference engine for performance increase - Right now we’re using Hugging Face’s transformers library to run our model which is based on PyTorch. However, there are dedicated inference engines such as vLLM which are engineered to improve the throughput of our model. In my experience, I’ve often found a 5-10x or more improvement on throughput speed (e.g. 200 samples/second with vLLM rather than 20 samples/second with pure transformers) when using a dedicated inference engine. For more, I’d try searching “vllm gemma 3 example”.
10.2 Extra-curriculum
If you want to learn more or continue the current project, I’d recommend trying the following.
Batched inference with Hugging Face Transformers - Let’s say you wanted to perform inference with the model across ~1 billion samples. Doing this 1 by 1 would take quite a long time. To fix this, you can perform batched inference, meaning the model predicts on multiple samples at a time (e.g. 16 samples at once instead of 1). This often dramatically speeds up inference time per sample and is highly recommended in practice.
LLM structured data extraction evaluation - In this notebook we evaluated our model’s output after fine-tuning by manually inspecting samples. And so far this looks good. However, in practice or a production setting, you’ll likely want to evaluate your models outputs in a more structured way. This notebook focuses on doing just that. Validating our model’s output structure as well as applying metrics to actual extraction values compared to the ground truth. Having these specific insights we can plan out how to improve our model’s performance in the future.
Speeding up batched inference with vLLM - If you want to step things up even further with faster inference, you’ll likely want to use a dedicated inference engine such as vLLM. Because vLLM is designed for fast inference, you’ll often see significant speed increases compared to using native Hugging Face transformers.
Advance your model with Reinforcement Learning (RL) - In this notebook we’ve used Supervised Fine-tuning (SFT) to get to produce certain outputs given certain inputs. However, for more advanced input and output pairs, you might want to look into reinforcement learning (RL). RL is a technique which uses reward functions to train a model to reproduce certain behaviours. For example, if you were using RL to improve a model’s ability to solve a math problem, it might get a +1 for getting the right answer. This is a simplified overview but RL is a potential next step in the training journey of our model. For more resources on this, look into:
GRPO Trainer in Hugging Face TRL - GRPO (Group Relative Policy Optimization) is a popular reinforcement learning algorithm for training models. It (and many other RL algorithms) are available in the TRL library.
No GPU left behind: Unlocking Efficiency with Co-located vLLM in TRL - Example of using vLLM to generate samples which help a model improve its own training over time. Workflow: generate responses with vLLM during training -> integrate responses back into training -> receive feedback -> keep improving training.
10.3 Extra resources
For more on LLM evaluations, I’d highly recommend checking out Hamel Husain’s blog on LLM Evals: Everything You Need to Know, also, the rest of Hamel’s blog is full of incredible resources so dig around.
For more on LLM training in general, the Post Training 101 blog post by Han Fang and Karthik Abinav Sankararaman is an excellent read and guide to various different training techniques to improve a base LLM model.
For a nice experiment on whether you should use SFT (Supervised Fine-tuning, what we’ve used in this notebook) or RL (Reinforcement Learning) for smaller models, see When Does Reinforcement Learning Help Small Language Models? by Distil Labs.
To see an example of a general model to extract structured data from text, see GLiNER2 by Fastino Labs. This model allows you to directly pass target items to extract as a prompt input and is able to run on CPU.